Category Archives: Android

Arduino Nano

Arduino Nano is basically a smaller version of Arduino board. There are 2 type of Arduino Nano at the time of writing:
  • Arduino Nano 3.0 (ATmega328)
  • Arduino Nano 2.3 (ATmega168)
More detail can be found here at official site The one I have here is v3. The obvious difference between an Uno and nano board I notice immediately is: nano board pins is facing towards bottom, where you normally mount it onto a small breadboard to use it. 20140918_232845 
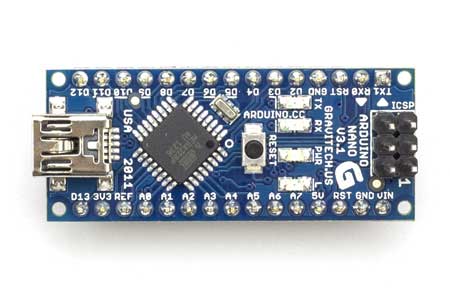
Next, all the pin sequence are different as shown in this picture. When uploading code from Arduino IDE, you might see some warning msg appearing at debug windows:
Sketch uses 3,010 bytes (9%) of program storage space. Maximum is 32,256 bytes. Global variables use 203 bytes (9%) of dynamic memory, leaving 1,845 bytes for local variables. Maximum is 2,048 bytes.
It means you actually scarify the memory space in exchange for the small footprint. So far I have used it for digital out & analog in and behave just the same with uno.

Android emulator too slow?

No worry, you can speed it up! You can use the Virtual Machine Acceleration to improve the execution speed. Many modern CPUs provide extensions to execute Virtual Machines more efficiently. Before attempting to use this type of acceleration, you need to determine if your current development system’s CPU, supports one the following virtualization technologies:
  • Intel Virtualization Technology (VT-x, vmx) → Intel VT-x supported processor list
  • AMD Virtualization (AMD-V, SVM), only supported for Linux (Since May 2006, all CPUs AMD include AMD-V, except Sempron).
Another way to find out if your Intel processor supports VT-x Technology, it’s by executing the Intel Processor Identification Utility, for Windows. you can download it from the Intel Download Center, or you can use the booteable utility, which is OS Independent. intel_pid_util_620px   So if you got these 2 red things enabled, congratulation! Else, too bad… In order to speed up the emulator, you need to download and install one or more Intel x86 Atom System Images, as well as the Intel Hardware Accelerated Execution Manager (HAXM). Open your Android SDK Manager, and select the Intel x86 Atom System Image, for whichever version that you want to test. Then go to Extras and select Intel x86 Emulator Accelerator (HAXM), and install those packages: asdk_man_intel_image_haxm After download, run the Intel installer, which is available within your Android SDK at extras/intel/Hardware_Accelerated_Execution_Manager. Note:If you have any problems installing the package, you can find more information and step by step guidance check this Intel Article.
  1. Install one or more Intel x86 Atom System Images as well as the Intel Hardware Accelerated Execution Manager, available under Extras.
  2. Run the Intel installer, which is available within your Android SDK at extras/intel/Hardware_Accelerated_Execution_Manager.
  3. Create a new AVD with the target set to an Intel image.
  4. When starting the emulator, ensure there are no error messages indicating a failure to load HAX modules.

Android default browser sucks

I am using the Samsung Galaxy s3 v4.1.2 and it used default android stock browser, and for the embedded webview component as well. One major issue i notice is when running javascript, weird things happen. For example, on form submit, i wanto prevent user from double clicking the submission button. Usually, a simple jquery javascript did the job and works well on desktop browser, including the mobile chrome browser, but not in the stock browser. The stock browser just failed to hide the form and show the loading div block, Button are disabled sometime and sometime not. But when I clicked back button, the loading div is displayed. So it seems like when form is submitted, the browser just stop all javascript processing. The best way to ensure submit button is disabled is actually to hide it by coding it in the html (old school method) rather in jquery. However, the previous way works well on a nexus device which used chrome as default browser. It works on ios devices too.

Font Awesome to PNG converter using PHP

Font Awesome gives you scalable vector icons that can instantly be customized — size, color, drop shadow, and anything that can be done with the power of CSS. It’s free and open source, available at http://fortawesome.github.io/Font-Awesome/ It’s very ready to use in HTML: I have created this open source at Github: https://github.com/exiang/php-font-awesome-to-png that helps you mass extract the icons into PNG images. Then, you can use it for your native mobile app development like ios, android and windows phone.
  1. First, download the zip file and extract it to htdocs\php-font-awesome-to-png-master
  2. Make sure your web server have php5 and gd module installed.
  3. We need to download fontawesome-webfont.ttf separately from https://github.com/FortAwesome/Font-Awesome/tree/master/fonts. Drop it into the same directory as the php code.
  4. You may run the php code from browser or console.
Modify the generate.php By default, php-font-awesome-to-png generate png images at the following size as this code shows: It’s a PHP array, just modify at your will to add-in or deduct any size. As for colors, it is define as PHP array too: Please note not to use 255,0,255 as it is reserved color for background trimming. Modify the icons.data.php icons.data.php is a mapping between the character code used by fontawesome into the outputted png file name. Edit it if necessary, for example when fontawesome added new icon. You will need to refer to fontawesome css file. http://netdna.bootstrapcdn.com/font-awesome/4.0.3/css/font-awesome.css For example, glass icon in css is: so the mapping in our php code would be like: Now, we are done 😉 Happy using the converter and please help the project by contribute your latest up to date icons.data.php that sync with fontawesome. TQ.