Category Archives: Ubuntu

Scheduling task on web server to database

Although it sounds simple, but please trust me that it always troubled me.

OS level Cron is a good choice but it does not have any protection against multiple execution. Let’s imagine you have created an event that executes every 10 seconds, but the logic inside the event (i.e. curl) can take longer than 10 seconds, so it can pile-up. In the worst case, when an event contains a follow up action of ‘insert’ query, it can cause duplication.

MySQL Event Scheduler that available on version 5.1.6 is at the database layer implementation but it has some way to avoid deadlock. https://www.percona.com/blog/2015/02/25/using-mysql-event-scheduler-and-how-to-prevent-contention/

Database layer of scheduler is useful if you just wanto modify the data without other ‘external’ action such sending email or calling another php script. It is also useful for database hosted on AWS RDS cloud.

Gearman is another totally different tool but kind of related. http://gearman.org/

Gearman provides a generic application framework to farm out work to other machines or processes that are better suited to do the work. It allows you to do work in parallel, to load balance processing, and to call functions between languages. It can be used in a variety of applications, from high-availability web sites to the transport of database replication events.

Imagine you crawling multiple website base on today captured records. Gearman help you distribute task evenly across available client, changing a ‘serial’ process into ‘parallel’. The speed it give you help to avoid the above mentioned deadlock situation. However, it still not protect against multiple execution.

For now, I find this article very helpful: http://bencane.com/2015/09/22/preventing-duplicate-cron-job-executions/
Checking arduino port on ubuntu

Sometime in processing, you will need to listen to the serial port that arduino attached to. Finding out the portIndex is easy on windows by simply checking in Control Panel -> Device Manager. However when you are in linux (ubuntu), you will need to use command to do it.
  1. First plugin your arduino to usb
  2. type lsusb to see list of attached usb devices
  3. type dmesg | tail and it show you which serial port your usb device bind to. In my case, it is something like: [3486.xxxxxx] usb 2-2: FTDI USB Serial Device Converter now attached to ttyUSB0
  4. or, you may also type dmesg | grep tty
  5. Then you need to figure out the index of this ttyUSB0. Ubuntu reserved ttyS0 to terminal and 1 until 31. normally ttyUSB0 means 32.
 

Arduino Clone vs FTDI

FTDI has been acting very unprofessional by pushed out a new driver with Windows Update that bricks counterfeit/clone/incompatible FTDI chips by setting the Product ID to “0000”. Here is the process that worked for me to return the FTDI chip back to its original VID:PID of 0403:6001 from a Linux (Ubuntu) computer.
  1. Plug in your bricked device.  If you run “lsusb” it should show a device at “0403:0000”.
  2. Download ft232r_prog from ft232r_prog (v1.24) and extract to a folder
  3. Install the build dependencies by running “sudo apt-get install make gcc libftdi-dev"
  4. Change directory into the folder cd /ft232r_prog
  5. Type “make” to build the program
  6. Now run “sudo ./ft232r_prog --old-pid 0x0000 --new-pid 0x6001
  7. You are done.  Unplug and re-insert your USB device and run “lsusb” again.  It should show an id of 0403:6001
However, if you just wanto use the chip on windows, you may follow this video tutorial: or https://learn.sparkfun.com/tutorials/how-to-install-ftdi-drivers/all
if somehow your USB Serial Port show a warning icon after you done all these, you may wanto follow this tutorial to set the PID from 0000 back to default 0001. http://electrohobby.es/Archivos/arduino%20nano%20fix.pdf?21e9af
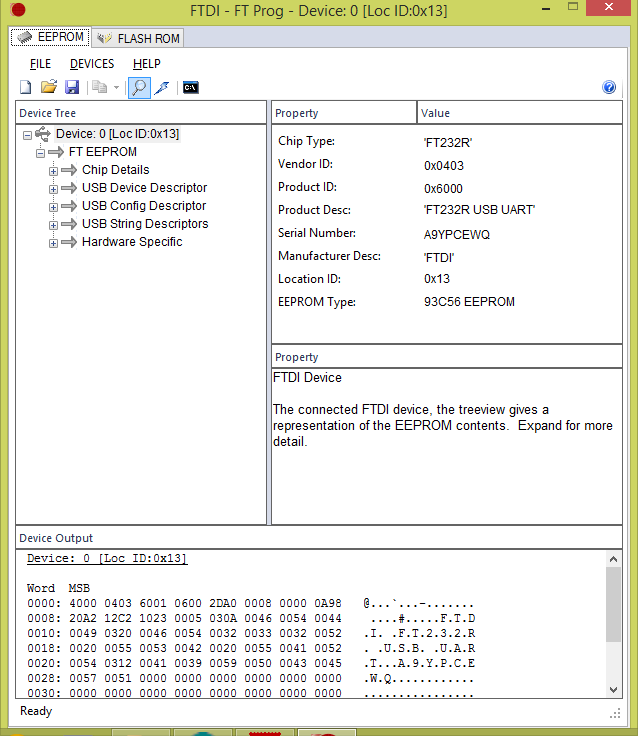
  1. Downlaod FT_Prog_v3.0.56.245.zip
  2. Install and run FT_Prog
  3. Click the magnificent glass and you see Product ID is 0x6000
pid0000
  1. Click USB Device Descriptor
  2. On the right panel, select FTDI Default
  3. Click the lightning icon to Program Devices
  4. Click Program button and it will be alright.

Installing processing on Ubuntu Desktop

I am using Ubuntu 14.04 To run Processing, you need to have JAVA. By default, ubuntu do not come with JAVA pre-installed due to licensing issue (DAMN! These biz ppl is blocking the earth turning again). There are 2 type of java runtime you can install, one from openJDK and another one from Oracle. Processing2 at this time of writing only work with the later one. Follow this tutorial on how to install Oracle Java to your ubuntu machine. The process can take up to 3 hours if you have a slow Internet line. After successfully installed, you may proceed to download processing. I like to place my processing under /opt.